Documentation / Tutorials / Awesome Enterprise
How to create Manage Screens using Awesome Enterprise
/ Awesome Enterprise / How to create Manage Screens using Awesome Enterprise
Table of Contents
- Introduction
- Manage, It’s Need and Purpose
- Pre-Requisites and Dependencies
- Building the Manage View
- Manage View
- Building “Manage” for “Contacts“ App
- Step 1.1: Register Contacts CPT, with its meta fields & taxonomy
- Step 1.2: Coding the Manage Part-1 Understanding args array of Manage.
- Step 1.3 Coding the Manage Part-2 Filters and Search functionality of Manage.
- Building the Single view of Manage
- Single view of Manage
- Building Single view of Manage for “Contacts“ App
- Step 1.4: Create “single” module in the Contacts app
- Step 1.5: Create “crud-single-contact-data” module in the Common Services.
- Step 1.6: Create “lead-block” module in the Common Services.
- Final Notes
Introduction
This tutorial is about building Enterprise Manage from scratch with step by step instructions. Before diving into the specifics, left first understand Manage with its need and purpose.
Manage, It’s Need and Purpose
“Manage” (verb) literally means,
“To succeed in doing or dealing with something, especially something difficult”
In our case, we are dealing with difficult things like handling large datasets (few million record sets) with the ability of CRUD operations on it. Make search operations blazing fast on these huge datasets or even creating & managing, custom & complex business workflows along with easy to use interface for all the stakeholders. And yes we do succeed to deal with these difficult things, by using “Manage” built on Awesome Enterprise.
The need for managing complex business workflows (along with its huge dataset’s) drives the purpose of Enterprise Manage.
One more thing, Enterprise Manage also solves another problem of handling these complex business process, all under a single umbrella with a unified and clutter-free interface to handle almost all things at one place instead of going back & forth between WordPress admin and frontend sections. This helps all the stakeholders to focus on what matters most important to them.
(Disclaimer: This feat is achieved by configuring things on various levels right from the server environment to custom data structures and everything in between.)
Pre-Requisites and Dependencies
Following is the list of dependencies for “Enterprise Manage.” Make sure that every dependency is met.
- PHP (7.0 +)
- MariaDB (10.3 +)
- MariaDB is an open source (RDBMS) which is a compatible drop-in replacement for the MySQL database. One of the main reason to use MariaDB is the support of Common Table Expression (CTE) using “WITH” keyword (CTE allows to refer to a subquery expression many times in a query as if having a temporary table that only exists for the duration of a query ).
- Redis Server
- Redis is an open-source in-memory database project implementing a distributed, in-memory key-value store with optional durability. It can be used as a database, cache and message broker.
- Redis supports different kinds of abstract data structures, such as strings, lists, sets, sorted sets, maps e.t.c. for further details visit these resources,
- Official Redis website
- To learn more about Redis, an excellent ebook “REDIS IN ACTION” is available for free which discusses Redis, right from its core concepts (data structure supported by Redis ) to more advanced concepts including a real-world example of how Redis helped to solve that specific problem.
- Plugins
- Latest WordPress
- Awesome Enterprise
- CPT UI (For managing Custom Post Types)
- Advanced Custom fields (For managing Custom Fields)
- Monomyth Enterprise Theme
- Awesome Enterprise Apps
- Site-skin App
- This App is responsible for configuration of CSS framework “awesome-css.”
- Backend Design App
- This App is responsible for registering styles and scripts used for specific look and feel of Enterprise Manage.
- Contact App
- This App is a “Starter Awesome Enterprise App” which is used to build our Enterprise Manage.
- Site-skin App
Note: For details regarding Awesome Enterprise Apps, please visit this URL.
- Awesome Enterprise Services
“Awesome Enterprise Services” allows reuse of the business logic which is common across various Awesome Apps, other Services e.t.c. These services are imported into WordPress Installation using WordPress Importer (in XML format).

Screenshot 1: Awesome Enterprise Services.
Following services are used in this tutorial,
-
- DB Services
- Responsible for all DB related operations.
- meta_query.
- Responsible for all DB related operations.
- DB Services
-
- Form Control Services
- Responsible for the rendering of form controls such as input type text, radio, select boxes e.t.c. Following modules from “Form control service”are used in the tutorial.
- date
- text
- section
- select
- Responsible for the rendering of form controls such as input type text, radio, select boxes e.t.c. Following modules from “Form control service”are used in the tutorial.
- Form Control Services
-
- UI Services
- Responsible for all rendering of UI blocks such as Menus, UI Cards e.t.c.
- Notification Services
- Used for sending is notifications using Emails or SMS.
- Search Services
- Responsible for handling search functionality along with actions taken on the returned dataset, such as display data as datatable or export data into CSV format.
- datatable
- csv
- fasttable
- search-submit
- handler-scripts
- new_ticket
- Responsible for handling search functionality along with actions taken on the returned dataset, such as display data as datatable or export data into CSV format.
- UI Services
-
- Single Services
- Responsible for functionality needed for “Single view of Manage.”
- Common Services
- Common Services has generic, site-specific code used in other Services, Apps e.t.c.
- search_filters
- Common Services has generic, site-specific code used in other Services, Apps e.t.c.
- Single Services
- MariaDB View
- Responsible for creating a view named as all_terms, so that WordPress tables wp_terms, wp_term_taxonomy, and wp_term_relationships tables are available as a single view to query.
CREATE ALGORITHM = MERGE VIEW `all_terms` AS
select `awesome-enterprise`.`wp_terms`.`term_id` AS `term_id`,`awesome-enterprise`.`wp_terms`.`name` AS `name`,
`awesome-enterprise`.`wp_terms`.`slug` AS `slug`,`awesome-enterprise`.`wp_term_taxonomy`.`term_taxonomy_id` AS `term_taxonomy_id`,
`awesome-enterprise`.`wp_term_relationships`.`object_id` AS `object_id`,
`awesome-enterprise`.`wp_term_taxonomy`.`taxonomy` AS `taxonomy`
from ((`awesome-enterprise`.`wp_term_relationships` join `awesome-enterprise`.`wp_term_taxonomy`
on(`awesome-enterprise`.`wp_term_relationships`.`term_taxonomy_id` =
`awesome-enterprise`.`wp_term_taxonomy`.`term_taxonomy_id`))
join `awesome-enterprise`.`wp_terms`
on(`awesome-enterprise`.`wp_terms`.`term_id` = `awesome-enterprise`.`wp_term_taxonomy`.`term_id`))
Code snippet 1: “all_terms” View.
- CPT named as “contact” with Name as post_title, Title, Mobile No., Email, Address, Designation as meta fields, County, City, Industry as taxonomies.
Building the Manage View
Let’s first have a glimpse of how “Enterprise Manage” looks.
Manage view
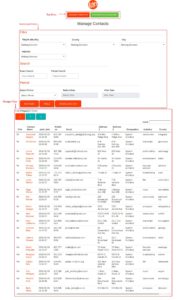
Screenshot 2: Manage View
Manage view can logically be divided into various sections, as shown in above screenshot 1.
- Top menu: This is where we define menu items.
- Filters and Search: Filtering options available on the data,
- Meta
- Taxonomy
- Period search (Search based on date.)
- Select Period
- Day / Days
- Month / Months
- Years
- Before Date
- After Date
- Select Period
- Search
- Exact Search
- Partial Search
Note: Besides the above options, filters and search on custom table or even a custom SQL filter query is supported by Enterprise Manage.
- Handlers: In what format the data is to be Handled is defined by Handlers or a better way to explain it is what to do with the filtered data, display it, export it e.t.c.
- Table (Display Data Table )
- Excel / CSV (Export)
- PDF (Download)
- Pie Chart
- Line Graph
- Bar Graph
- Filtered Data: Filtered Data displayed in Tabular format.
Until now we had a view of how “Enterprise Manage” looks, now let’s build it step by step.
Building “Manage” for “Contacts“ App
The best way to learn something new, (especially in the world of programming ) is to take a real-world example and use it as a vehicle for learning. So for this tutorial, Let’s say we want to “Manage List of Contacts.” The “Manage” should be able to handle operations such as Edit, Update, Search and filter e.t.c. on the list of Contacts.
Step 1.1: Register Contacts CPT, with its meta fields & taxonomies
To store the data of contacts we are using a CPT named as “contact.” For simplicity purposes, we are assuming there is data available for us to manage (around 50 Contacts).
For registering CPT, we are using CPT UI, and for handling CPT’s meta, we are using ACF which are third-party plugins. So it is left to the reader to create the required custom post type, its meta, and taxonomies.
A contact has its metadata such as
- Name: (CPT title)
- Title (CPT meta)
- Mobile No. (CPT meta)
- Email (CPT meta)
- Address (CPT meta)
- Designation (CPT meta)
- Industry (Taxonomy)
- County (Taxonomy)
- City (Taxonomy)
Note: For this tutorial purposes we are considering few Contacts fields as our focus is on learning how to build Enterprise Manage. Although we have a limited number of contacts fields, they are sufficient enough to explain how to build an Enterprise Manage and understand its working.
Step 1.2: Coding the Manage Part-1 Understanding args array of Manage.
To start with first create a module in the “Contact app” and name it as “manage.” Contact App is already created and available to us. A brief tutorial on how to create an Awesome Enterprise App is available here. Inside this module copy paste following code snippet,
[module.set_array args]
  [after_submit raw]
    [query]
    	 //**[atts debug_dataset=yes /]
       [debug_form_data]yes[/debug_form_data]
        [debug]yes[/debug]**//
      [pagesize]20[/pagesize]
      [with]
      	[published_posts post_type="contact" /]

      	[filter new field='post_title' field_value={form_data.title} not_empty={form_data.title}/]

        [filter new taxonomy='contact_city' term='{form_data.city}' not_empty={form_data.city} /]

        [filter new taxonomy='contact_county' term='{form_data.county}' not_empty={form_data.county} /]

        [filter new taxonomy='contact_industry' term='{form_data.industry}' not_empty={form_data.industry} /]

        [filter new not_empty={form_data.exact}]
          	[sql raw]

select [module.previous_query_no /].* from wp_postmeta
 join [module.previous_query_no /] on
              [module.previous_query_no /].data_id=wp_postmeta.post_id
join wp_post on
              [module.previous_query_no /].data_id=wp_posts.ID

     where
    (wp_postmeta.meta_key in ( 'title', 'mobile_no', 'email','address_1', 'address_2', 'designation' )
         and wp_postmeta.meta_value like '%[env.form_data.exact /]%')
         and wp_post.post_title like '%[env.form_data.exact /]%'

            [/sql]
          [/filter]
      [/with]

     [transform ref_id=data_id /]
     [meta new]
		[meta_keys]
			title,mobile_no,email,address_1,address_2,designation
        [/meta_keys]
      [/meta]
       [meta new field='post_title' /]
       [meta new field='ID' /]
      [meta new]
         [taxonomy]contact_city,contact_county,contact_industry[/taxonomy]
      [/meta]
    [/query]
    [table]
      [column new label='Title' meta_key=title /]
      [column new label='Contact Name']
    	  [calc raw]
    	    <a target="_blank" href='[app.path /]/single/[aw2.get row.ID /]'>
    	      [aw2.get row.post_title /]
    	    </a>
    	   [/calc]
      [/column]
      [column new label='Mobile no' meta_key=mobile_no /]
      [column new label='Email' meta_key=email /]
      [column new label='Address 1' meta_key=address_1 /]
      [column new label='Address 2' meta_key=address_2 /]
      [column new label='Designation' meta_key=designation /]
      [column new label='Industry' meta_key=contact_industry /]
      [column new label='County' meta_key=contact_county /]
      [column new label='City' meta_key=contact_city /]
    [/table]
  [/after_submit]
    [filters]
	  [section filter keys='title,county,city,industry' /]
      [section search keys='exact,generic' /]
     //** [section period keys="select_period, before_date, after_date" /]**//
	[/filters]
  [handlers]
  	  //** Required: atleast one Handler **//
      [fasttable label='Fast(100)' max_count=100][/fasttable]
      [datatable]
      	[label] Table [/label]
      [/datatable]
      [csv filename='t2.csv'][/csv]
  [/handlers]
[/module.set_array]

[common.search_filters.main args="{module.args}" title="Manage Contacts"
	auto_handler="fasttable"   //** Required: atleast one Auto Handler **// /]
Code snippet 2: “manage” module in Contact App.
As seen in the above code snippet, we have declared and initialized args array. This array of shortcodes which be logically divided into sections as follows,
- After Submit Section:
The first section (generally) is a “after submit” using [after_submit] shortcode, which defines a “with” query ( Basically MariaDB’s Common Table Expression [CTE] referenced later in subqueries ) using [with ] shortcode inside a [query] shortcode and which is the “main query” for required resultset.
Inside [with] shortcode, all Contacts with post status as published is queried. Following sub-code snippet, 2-1 depicts this.
[after_submit raw]
[query]
      [pagesize]20[/pagesize]
      [with]
      	[published_posts post_type="contact" /]
         //** Other shortcodes under [with] shortcode goes here **//
      [/with]
      //** Other shortcodes under [query] shortcode goes here **//
[/query]
[/after_submit]
Sub-Code snippet 2-1: “published_posts” of post_type “contact” main query.
Next, we use [filter] shortcode(s) to filter data on post meta title and all terms of taxonomies contact_city, contact_county, and contact_industry.
Exact & Generic search operations are available to search through contact data. These operations looks for data for searched keyword in Mobile no., Email, address and designation field of Contacts.
If required we can use the shortcode [add_field], if we want to order or group the selected data. Following sub-code snippet, 2-2 depicts this.
[after_submit raw]
[query]
      [pagesize]20[/pagesize]
      [with]
       //** Other shortcodes under [with] shortcode goes here **//

        [filter new field='post_title' field_value={form_data.title} not_empty={form_data.title}/]
        [filter new taxonomy='contact_city' term='{form_data.city}' not_empty={form_data.city} /]
        [filter new taxonomy='contact_county' term='{form_data.county}' not_empty={form_data.county} /]
        [filter new taxonomy='contact_industry' term='{form_data.industry}' not_empty={form_data.industry} /]

        [filter new not_empty={form_data.exact}]
          	[sql raw]
              select [module.previous_query_no /].* from wp_postmeta join [module.previous_query_no /] on
              [module.previous_query_no /].data_id=wp_postmeta.post_id
                          where
                         wp_postmeta.meta_key in ( 'mobile_no', 'email','address_1', 'address_2', 'designation' )
         and wp_postmeta.meta_value = '[env.form_data.exact /]'
            [/sql]
          [/filter]

          [filter new not_empty={form_data.generic}]
          	[sql raw]
              select [module.previous_query_no /].* from wp_postmeta join [module.previous_query_no /] on
              [module.previous_query_no /].data_id=wp_postmeta.post_id
                          where
                         wp_postmeta.meta_key in ( 'mobile_no', 'email','address_1', 'address_2', 'designation' )
         and wp_postmeta.meta_value like '%[env.form_data.generic /]%'
            [/sql]
          [/filter]

       //** Other shortcodes under [with] shortcode goes here **//
      [/with]
  //** Other shortcodes under [query] shortcode goes here **//
[/query]
[/after_submit]
Sub-Code snippet 2-2: Filters applied to main “With” query.
Next, we transform/ transpose the data from row-based format to column-based format to display it in a tabular format. Following sub-code snippet, 2-3 depicts this.
[after_submit raw]
[query]
      [pagesize]20[/pagesize]
      [with]
       //** Other shortcodes under [with] shortcode goes here **//
      [/with]

      [transpose ref_id=data_id /]

  //** Other shortcodes under [query] shortcode goes here **//
[/query]
[/after_submit]
Sub Code snippet 2-3: transform / transpose data returned from “With” query.
Transpose means,
“cause (two or more things) to exchange places.”
The format of data returned from With query is,
![]()
Screenshot 3: Data before transform
so when we use transform/ transpose shortcode, above rows are transformed into the following format,
![]()
Screenshot 4: Data after transform
The next step is to specify columns required for fetching data, displayed in a tabular structure (as shown in screenshot 2).
[after_submit raw]
[query]
      [pagesize]20[/pagesize]
      [with]
       //** Other shortcodes under [with] shortcode goes here **//
      [/with]
      //** Other shortcodes under [query] shortcode goes here **//

   //** Fetch data by meta_keys of the queried CPT </span> **//
     [meta new]
           [meta_keys]
             title,mobile_no,email,address_1,address_2,designation
           [/meta_keys]
      [/meta]

      //** Fetch post_title of the queried CPT **//
      [meta new field='post_title' /]

     //** Fetch terms of taxonomies, of the queried CPT **//
   [meta new]
    [taxonomy]contact_city,contact_county,contact_industry[/taxonomy]
    [/meta]
[/query]
[/after_submit]
Sub-Code snippet 2-4: Fetch contact data.
We are fetching data using [meta_keys] and [ taxonomies] shortcodes, and inside [meta] shortcode, as seen in the above sub-code snippet 2-4.
Note: The query built for fetching data (such post meta, taxonomies, or even for data from the custom table ) has the following format.
SELECT 'some_column_fetched' AS type,
           data_id ,
          'some_column_fetched' as meta_key,
          'some_column_fetched' as meta_value
Where,
type: is a string, “data_id” and “meta.”
meta_key: Specifies the column name of the table from which the data is fetched. It could be following column names,
- To fetch any column name of Enterprise meta table with Columns stamp, object_id, coll_id, coll_type, meta_key, meta_value
- Use [aw2_collection_keys] shortcode
- Sample generated query:
- SELECT ‘some_type’ AS type, data_id , coll_id as meta_key, ‘some_column’ as meta_value
- To fetch meta, ( meta_key column of from wp_postmeta WordPress table )
- Use [meta_keys] shortcode
- Sample generated query:
- SELECT ‘some_type’ AS type, data_id , meta_key as meta_key, ‘some_column’ as meta_value
- To fetch taxonomies column of all_terms view
- Use [taxonomy] shortcode
- Sample generated query:
- SELECT ‘some_type’ AS type, data_id, ‘taxonomy’ as meta_key, ‘some_column’ as meta_value
The final part of “After submit” section is [table] shortcode, is as depicted in sub-code snippet 2-5.
[after_submit raw]
    [query]
          //** Other shortcodes under [query] shortcode goes here **//
    [meta new]
	[meta_keys]
		title,mobile_no,email,address_1,address_2,designation
        [/meta_keys]
      [/meta]
      [meta new field='post_title' /]
      [meta new field='ID' /]
      [meta new]
         [taxonomy]contact_city,contact_county,contact_industry[/taxonomy]
      [/meta]
    [/query]
    [table]
      [column new label='Title' meta_key=title /]
      [column new label='Contact Name']
    	  [calc raw]
    	    <a target="_blank" href='[app.path /]/single/[aw2.get row.ID /]'>
    	      [aw2.get row.post_title /]
    	    </a>
    	   [/calc]
      [/column]
      [column new label='Mobile no' meta_key=mobile_no /]
      [column new label='Email' meta_key=email /]
      [column new label='Address 1' meta_key=address_1 /]
      [column new label='Address 2' meta_key=address_2 /]
      [column new label='Designation' meta_key=designation /]
      [column new label='Industry' meta_key=contact_industry /]
      [column new label='County' meta_key=contact_county /]
      [column new label='City' meta_key=contact_city /]
    [/table]
[/after_submit]
Sub-Code snippet 2-5: Display contact data.
[column] shortcode inside the [table] shortcode, the maps the [meta_keys] and [taxonomy] shortcode inside [meta] shortcode (as seen in sub-code snippet 2-5) and displays the data in a tabular format (thanks [transform] / [transpose] shortcode).
- Filters section:
Sections which are to be displayed for filtering data are listed here. Following sub-code snippet, 2-6 depicts this.
[after_submit raw]
     //** Other shortcodes under [after_submit] shortcode goes here **//
[/after_submit]

[filters]
	  [section filter keys='title,county,city,industry' /]
          [section search keys='exact,generic' /]
          [section period keys="select_period, before_date, after_date" /]
[/filters]
Sub-Code snippet 2-6: Filters Section.
- Handlers section:
This section is (generally) the last section of the main args array tells, what to do with the filtered data. Or in other words what action to take on the filtered data. Below code snippet depicts this,
[handlers]
  	  //** Required: atleast one Handler **//
      [fasttable label='Fast(100)' max_count=100][/fasttable]
      [datatable]
      	[label] Table [/label]
      [/datatable]
      [csv filename='t2.csv'][/csv]
  [/handlers]
Sub-Code snippet 2-7: Handlers section.
We have following handlers options available,
- [fasttable]
- Display specific no. of records quickly (In our case 100 set by max_count shortcode parameter of the fasttable) .
- [datatable]
- Display table with limit set by [pagesize] shortcode (in our case Limit is 10 records )
- [csv], [excel]
- Export data as CSV or Excel.
- [pie-chart], [line-graph], [bar-graph]:
- Display charts and graphs of the filtered data.
The concludes the discussion sections of the args array. Next step is to consume this array for displaying search and filters, handling its form submission and viewing data based on it.
Step 1.3 Coding the Manage Part-2 Filters and Search functionality of Manage.
args array is passed as an argument to the main template of search module of Common Services, in the manage module of the Contact app. Also, auto_handler (required) parameter of the main template is set to fasttable.
When the Manage home screen loads for the first time, an ajax request is made to display data by default. The auto_handler parameter depicts what action to take on data. Following code snippet, 2-8 depicts this,
[common.search_filters.main args="{module.args}" title="Manage Contacts"
	auto_handler="fasttable"   //** Required: At least one Auto Handler **// /]
Sub-Code snippet 2-8: “args” array & “auto_handler” parameter passed to “search_filters” module.
Next, create “search_filters” module under Common Services and copy paste following code snippet inside it.
//**
First section : set options array for meta and taxonomy filter
**//
[query.get_terms taxonomies=contact_city fields=names set="module.contact_city" hide_empty=0]
{}
[/query.get_terms]

[query.get_terms get_terms taxonomies="contact_county" set="module.contact_county" hide_empty=0]
{}
[/query.get_terms]

[query.get_terms get_terms taxonomies="contact_industry"
	set="module.contact_industry" hide_empty=0]
{}
[/query.get_terms]


[module.set_array title.new label="Mr." value="mr"/]
[module.set_array title.new label="Mrs" value="mrs"/]
[module.set_array title.new label="Ms" value="ms"/]

[module.set_array filter_fields]

  [title type="select" label="Title(Mr./Mrs/Ms)" options="{module.title}" /]
  [county type="select" label="County" options="{module.contact_county}" taxonomy="contact_county"/]
  [city type="select" label="City" options="{module.contact_city}" taxonomy="contact_city"/]
 [industry type="select" label="Industry" options="{module.contact_industry}" taxonomy="contact_industry"/]

  [generic type="text" label="Partial Search"/]
  [exact type="text" label="Exact Search"/]

[/module.set_array]


[module.set column_type="col-md-4" divider_after="3"/]

//**
	First section : set options array for meata and taxnomy filter
**//

//* main template to run *//
[templates.add main]

  [search_service.new_ticket args='{template.args}' set='module.ticket' /]

  [template.get args.filters.section set="template.section" /]
  <div class="container">

 	<h2 class="text-center">[template.get title/]</h2>
      <div class="brand-white-bg">
      <div class="gap-3"></div>
      	<article role="search" id="search" class="col-md-12">
      	<section role=form class="container">
        	<form id="search_form" class="search_form row">

        [loop.@section template.section]
        	[template.set html="" /]

            [module.set required_keys="@section.item.required" /]

            [templates.render_filter_sections
                        section_keys="{@section.item.keys}"
                        settings="{@section.item}"
                        list="filter,search,period,series"
                        contains="{@section.key}" set="template.html"/]

		[form_control.section id="{@section.key}" html="{template.html}" title="{@section.key}" /]

        [/loop.@section]

          <script type="spa/axn"
                  axn="form.ajax"
                  bind="submit"
                  bind_selector="#search_form"
                  route_ajax="t/[module.get ticket]"
                  disable_selector=".js-submit-job"></script>
         <div class="btns">

 		      [search_service.handler-scripts handlers="{template.args.handlers}" auto_handler="{template.auto_handler}"  /]

</div>

        </form>
          </section>
         <section role=results></section>
         </article>
        </div>
        </div>
       </div>
 [/templates.add]


 //*
   Template to Render filter sections
 *//
 [templates.add render_filter_sections]

 	[template.get section_keys explode="," set="template.section_key_parts" /]

     <div class="row">
     [template.set cnt="1" /]
     [loop.@section_key_parts template.section_key_parts]

        [aw2.get @section_key_parts.item.trim set="template.section_key_part" /]
      	[module.get
                filter_fields.{template.section_key_part}
                set="template.render_single_field_manage"/]

            <div class="[module.get column_type /]">
    			[templates.render_filter_fields
                            render_single_field_manage="{template.render_single_field_manage}"
                            section_key_part="{template.section_key_part}"/]
    			</div>
           [math.solve main="{template.cnt}+1" set="template.cnt" /]

          [if.equal lhs="{template.cnt}" rhs="4"]
          	[template.set cnt=1/]
           		<div class="col-md-12"></div>
           [/if.equal]
        [/loop.@section_key_parts]
      </div>
 [/templates.add]

  //*
   Template to Render filter fields in section.
 *//
 [templates.add render_filter_fields]
   [aw2.switch]
    	[aw2.case cond="{template.render_single_field_manage.type}" equal="select"]
       [form_control.select id="{template.section_key_part}"
              label='{template.render_single_field_manage.label}'
               options_array='{template.render_single_field_manage.options}'
               multiple='{template.dataset.multiple}'
               value="{template.val}"
               required="{module.temp_required}"
               cond="{template.section_key_part}"
               equal="title"
               /]
          [form_control.select id="{template.section_key_part}"
              label="{template.render_single_field_manage.label}"
              taxonomy="{template.render_single_field_manage.taxonomy}"
               cond="{template.section_key_part}"
               not_equal="title"
            /]

      [/aw2.case]
      [aw2.case_else]
          [form_control.run {template.render_single_field_manage.type}
                id="{template.section_key_part}"
                placeholder="{template.render_single_field_manage.label}"
                label='{template.render_single_field_manage.label}'
                cond="{template.render_single_field_manage.type}"
               not_equal="select"
                /]
        [/aw2.case_else]
    [/aw2.switch]
 [/templates.add]
Code snippet 3: “search_filters” module of Common Services.
The main functionality of search_filters module is to build the HTML view of filters such as title, city industry and county (as seen in screenshot 1) with its form submit actions such as fasttable, csv (download CSV) e.t.c.
To understand search_filters module (above code snippet 3), let’s divide it into sections so that we can digest it one at a time.
- Global module variables section:
This is the first section before the main template, defining variables for drop down options of Title, City, County, and Industry select boxes.
Variable declared outside any template of the module, can be accessed in all the templates making them global with respect to the current module.
//**
First section : Set options array for meta and taxonomies filters
**//
[query.get_terms taxonomies=contact_city fields=names set="module.contact_city" hide_empty=0]
{}
[/query.get_terms]

[query.get_terms get_terms taxonomies="contact_county" set="module.contact_county" hide_empty=0]
{}
[/query.get_terms]

[query.get_terms get_terms taxonomies="contact_industry"
	set="module.contact_industry" hide_empty=0]
{}
[/query.get_terms]

[module.set_array title.new label="Mr." value="mr"/]
[module.set_array title.new label="Mrs" value="mrs"/]
[module.set_array title.new label="Ms" value="ms"/]

[module.set_array filter_fields]

  [title type="select" label="Title(Mr./Mrs/Ms)" options="{module.title}" /]
  [county type="select" label="County" options="{module.contact_county}" taxonomy="contact_county"/]
  [city type="select" label="City" options="{module.contact_city}" taxonomy="contact_city"/]
 [industry type="select" label="Industry" options="{module.contact_industry}" taxonomy="contact_industry"/]

  [generic type="text" label="Partial Search"/]
  [exact type="text" label="Exact Search"/]

[/module.set_array]

[module.set column_type="col-md-4" divider_after="3"/]
Sub-Code snippet 3-1:”Global module variables” section of “search_filters” module of Common Services.
- Main template section:
The main template is called from manage module of the Contact App as depicted at last line of code snippet 2.
//**
Second section : Main template which displays the Search and filters section and bind events to its respective actions buttons.
**//

[templates.add main]

  [search_service.new_ticket args='{template.args}' set='module.ticket' /]

  [template.get args.filters.section set="template.section" /]
  <div class="container">

 	<h2 class="text-center">[template.get title/]</h2>
      <div class="brand-white-bg">
      <div class="gap-3"></div>
      	<article role="search" id="search" class="col-md-12">
      	<section role=form class="container">
        	<form id="search_form" class="search_form row">

        [loop.@section template.section]
        	[template.set html="" /]

            [module.set required_keys="@section.item.required" /]

            [templates.render_filter_sections
                        section_keys="{@section.item.keys}"
                        settings="{@section.item}"
                        list="filter,search,period,series"
                        contains="{@section.key}" set="template.html"/]

		[form_control.section id="{@section.key}" html="{template.html}" title="{@section.key}" /]

        [/loop.@section]

          <script type="spa/axn"
                  axn="form.ajax"
                  bind="submit"
                  bind_selector="#search_form"
                  route_ajax="t/[module.get ticket]"
                  disable_selector=".js-submit-job"></script>
         <div class="btns">

 		      [search_service.handler-scripts handlers="{template.args.handlers}" auto_handler="{template.auto_handler}"  /]

</div>

        </form>
          </section>
         <section role=results></section>
         </article>
        </div>
        </div>
       </div>
 [/templates.add]


 //*
   Template to Render filter sections
 *//
 [templates.add render_filter_sections]

 	[template.get section_keys explode="," set="template.section_key_parts" /]

     <div class="row">
     [template.set cnt="1" /]
     [loop.@section_key_parts template.section_key_parts]

        [aw2.get @section_key_parts.item.trim set="template.section_key_part" /]
      	[module.get
                filter_fields.{template.section_key_part}
                set="template.render_single_field_manage"/]

            <div class="[module.get column_type /]">
    			[templates.render_filter_fields
                            render_single_field_manage="{template.render_single_field_manage}"
                            section_key_part="{template.section_key_part}"/]
    			</div>
           [math.solve main="{template.cnt}+1" set="template.cnt" /]

          [if.equal lhs="{template.cnt}" rhs="4"]
          	[template.set cnt=1/]
           		<div class="col-md-12"></div>
           [/if.equal]
        [/loop.@section_key_parts]
      </div>
 [/templates.add]

  //*
   Template to Render filter fields in section.
 *//
 [templates.add render_filter_fields]
   [aw2.switch]
    	[aw2.case cond="{template.render_single_field_manage.type}" equal="select"]
       [form_control.select id="{template.section_key_part}"
              label='{template.render_single_field_manage.label}'
               options_array='{template.render_single_field_manage.options}'
               multiple='{template.dataset.multiple}'
               value="{template.val}"
               required="{module.temp_required}"
               cond="{template.section_key_part}"
               equal="title"
               /]
          [form_control.select id="{template.section_key_part}"
              label="{template.render_single_field_manage.label}"
              taxonomy="{template.render_single_field_manage.taxonomy}"
               cond="{template.section_key_part}"
               not_equal="title"
            /]

      [/aw2.case]
      [aw2.case_else]
          [form_control.run {template.render_single_field_manage.type}
                id="{template.section_key_part}"
                placeholder="{template.render_single_field_manage.label}"
                label='{template.render_single_field_manage.label}'
                cond="{template.render_single_field_manage.type}"
               not_equal="select"
                /]
        [/aw2.case_else]
    [/aw2.switch]
 [/templates.add]
Sub Code snippet 3-2:”Main” template which displays Search and filters along with its action options.
The first thing we do in the Main template is to create a ticket from Search Services. Ticket generation is a concept used for form submission. It generates a masked URL, to which the form data is to be submitted by AJAX.
Pro Tip: To directly call Services on a button click, Tickets are used.
Following code snippet depicts this,
[search_service.new_ticket args='{template.args}' set='module.ticket' /]
Sub-Code snippet 3-3: Generate masked URL for Form submissions.
The next thing we do is that we render the filter section (as depicted screenshot 1). We loop through sections set in the main args array and render individual filters using Form Control Services.
Inside the loop two templates render_filter_sections (to render sections) inside which render_filter_fields (to render individual filter field) are called.
  [loop.@section template.section]
        	[template.set html="" /]
            [module.set required_keys="@section.item.required" /]

            [templates.render_filter_sections
                        section_keys="{@section.item.keys}"
                        settings="{@section.item}"
                        list="filter,search,period,series"
                        contains="{@section.key}" set="template.html"/]

		[form_control.section id="{@section.key}" html="{template.html}" title="{@section.key}" /]

   [/loop.@section]
Sub-Code snippet 3-4: Loop to display Search and Filters sections.
Form Controls Service handles the logic for building the HTML of the filter fields of types such as date, text and select e.t.c.
Next, in the search_filters main template, submit action of Form (with id as search_form) is bound to the button of class “js-submit-job.” Also, the form attribute route_ajax is set to ticket created by a new_ticket.
 <script type="spa/axn"
                  axn="form.ajax"
                  bind="submit"
                  bind_selector="#search_form"
                  route_ajax="t/[module.get ticket]"
                  disable_selector=".js-submit-job"></script>
Sub-Code snippet 3-5: Bind Form submit action to a button and specify its route_ajax.
Once the form is bound, “handler-scripts” module of Search Services creates buttons (defined in [handlers] section of main args array) and bind its click event of various handlers such as fasttable, table e.t.c.
[search_service.handler-scripts handlers="{template.args.handlers}" auto_handler="{template.auto_handler }"/]
Sub-Code snippet 3-6: “auto_handler” parameter of “handler-scripts” search service.
“handler-scripts” module is also responsible for auto submit of the search form for the first time on page load using the autohandler parameter of search_filters module of Common Services.
This concludes the Building the Manage view section of this tutorial and we achieve the functionality as depicted in the screenshot 1.
Building Single view of Manage
Let’s first have a glimpse of how the Single view of Enterprise Manage looks.
“Single” view of Manage
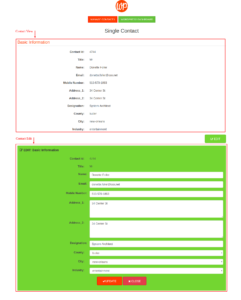
Screenshot 3: Single View of Manage.
The “Single view of Manage” is for viewing a single Contact data along with the functionality to Edit and Update it. Screenshot 3 depicts this.
Building Single view of Manage for “Contacts“ App
Step 1.4: Create “single” module in the Contacts app.
Create a module in the contacts app named as single and paste in following code snippet,
[templates.add main]

  //****resolve data in single_data****//
  [do.single_data]

	[env.set single_data.contact_post_id={qs.0}/]

 	[common.crud-single-contact-data.get_contact_data post_id={single_data.contact_post_id}/]

    //** Lead Personal Details **//
    [common.lead-block.editable_personal_details /]

    //****render display page****//
    [single_service.display.main header='Single Contact' /]

  [/do.single_data]

[/templates.add]
Code snippet 4: “single” module in the Contacts app.
As seen from the above code snippet, we get the query string parameter of the zeroth index qs.0 (which is basically, the post id of Contact CPT that we want to edit) set into single_data environment variable.
Next, we call a template “get_contact_data” of “crud-single-contact-data” module of Common Services which sets the contact data of the into a single_data. environment variable
This variable is then used by the “editable_personal_details” template of lead-block module and display module of Single services.
Step 1.5: Create “crud-single-contact-data” module in the Common Services.
Create a module in the Common Services named as “crud-single-contact-data” and paste in following code snippet.
//****get Contact single data****//
[templates.add get_contact_data]

[query.get_post post_id="{template.post_id}"
                     set='single_data.contact_cpt_post' /]

  	[aw2.set single_data.contact_data.contact_post_id=
                             "{template.post_id}" /]

  	[aw2.set single_data.contact_data.name=
    		 			"{single_data.contact_cpt_post.post_title}" /]

  //****Contact single meta	****//
  [aw2.get single_data.contact_cpt_post.meta set=template.temp_meta /]
  [loop.@rs template.temp_meta]
  		[if.contains needle="{@rs.key}" haystack="title,mobile_no,email,address_1,address_2,designation"]
  			[aw2.get @rs.item.0 set=single_data.contact_data.{@rs.key} /]
        [/if.contains]
  [/loop.@rs]


 	//**** Taxonomy contact_county ****//
     [aw2.set template.temp_taxonomy="" /]
  	[aw2.get single_data.contact_cpt_post.taxonomy.all.contact_county set=template.temp_taxonomy /]
     [loop.@rs template.temp_taxonomy]
        [if.true @rs.even]
        	[template.set in_between="," /]
        [/if.true]
        [if.else]
        	[template.set in_between="" /]
        [/if.else]

  		[template.set temp_taxonomy_county="{template.temp_taxonomy_county}{template.in_between}{@rs.item.name}"/]
   	[/loop.@rs]

   	[aw2.set single_data.contact_data.contact_county="{template.temp_taxonomy_county}" /]

 	//****Contact taxonomy contact_city ****//
     [aw2.set template.temp_taxonomy="" /]
  	[aw2.get single_data.contact_cpt_post.taxonomy.all.contact_city set=template.temp_taxonomy /]

     [loop.@rs template.temp_taxonomy]

        [aw2.get @rs dump=true /]

        [if.true @rs.even]
        	[template.set in_between="," /]
        [/if.true]
        [if.else]
        	[template.set in_between="" /]
        [/if.else]

  		[template.set temp_taxonomy_city="{template.temp_taxonomy_city}{template.in_between}{@rs.item.name}"/]
   	[/loop.@rs]

   	[aw2.set single_data.contact_data.contact_city="{template.temp_taxonomy_city}" /]

 	//**** Taxonomy contact_city ****//
  [aw2.set template.temp_taxonomy="" /]
  	[aw2.get single_data.contact_cpt_post.taxonomy.all.contact_industry set=template.temp_taxonomy /]
     [loop.@rs template.temp_taxonomy]
        [if.true @rs.even]
        	[template.set in_between="," /]
        [/if.true]
        [if.else]
        	[template.set in_between="" /]
        [/if.else]

  		[template.set temp_taxonomy_industry="{template.temp_taxonomy_industry}{template.in_between}{@rs.item.name}"/]
   	[/loop.@rs]

   	[aw2.set single_data.contact_data.contact_industry="{template.temp_taxonomy_industry}" /]

      [if.empty template.return_val]
    		[env.set single_data.block.meta_data="{single_data.contact_data}" /]
     [/if.empty]

[/templates.add]

//**
Get Contact Data for Edit View
**//
[templates.add get_edit_contact_data]
	[env.set single_data.block.meta_data='' /]
	[common.crud-single-contact-data.get_contact_data post_id={single_data.block.contact_post_id}  /]

[/templates.add]

//**
Update Contact Data
**//
[templates.add update_contact_data]
    //*****loop through all the fields*****//
    [loop.@field single_data.block.field]
    	[env.get single_data.request.{@field.key} set=template.value/]
   		[query.update_post_meta
      		post_id='{single_data.block.contact_post_id}'
            meta_key='{@field.key}'
            meta_value="{template.value}" set="template.error"/]

    [/loop.@field]

  	//***set success acknowledgement****//
    [template.set_array ack reason="{single_data.block.label} has been updated." c.cond="template.ack.status" c.eq="s:success"/]

    //*****return acknowledgement****//
    [template.return template.ack/]
[/templates.add]
Code snippet 5: “crud-single-contact-data” module of Common Services.
crud-single-contact-data module’s template “get_contact_data” gives sets the Contact data in an environment variable called single_data.contact_data to view & edit it.
Further, this module also has a template which handles the update logic, when the edit form of Contact is submitted.
Step 1.6: Create a module named lead-block in the Common Services.
Create a new module called as lead-block under Common Services and copy paste the following code snippet,
[templates.add editable_personal_details]
  [env.set_array single_data.blocks.new]
    //** Single View **//
    [atts label = "Basic Information" contact_post_id={single_data.contact_post_id} meta_data={single_data.contact_data} /]
    [action]display_form[/action]

    //** Edt Update Section **//
    [edit_service action="common.crud-single-contact-data.get_edit_contact_data"]
    [update_service action="common.crud-single-contact-data.update_contact_data"/]
    [field contact_post_id label="Contact Id" edit=no data_type="text" /]
  	[field title label="Title" edit=no data_type="text" /]
  	[field name label="Name" edit=yes data_type="text" /]
    [field email label="Email" edit=yes data_type = "text" /]
    [field mobile_no label = "Mobile Number" edit=yes data_type="text" /]
    [field address_1 label="Address_1" edit=yes data_type="textarea" /]
    [field address_2 label="Address_2" edit=yes data_type="textarea" /]
    [field designation label="Designation" edit=yes data_type="text" /]
  	[field contact_county label="County" edit=yes data_type="select" taxonomy="contact_county" /]
  	[field contact_city label="City" edit=yes data_type="select" taxonomy="contact_city" /]
    [field contact_industry label="Industry" edit=yes data_type="select" taxonomy="contact_industry" /]
    [edit_service action="common.crud-single-contact-data.get_edit_contact_data"/]
    [update_service action="common.crud-single-contact-data.update_contact_data"/]
  [/env.set_array]
[/templates.add]
Code snippet 6: “lead-block” module of Common Services.
As seen from above snippet, first we create an array named as single_data.blocks as an environment variable, containing a list of shortcodes, which handles the logic required for viewing, editing and updating Contact details.
Single view of contact is achieved by [action] shortcode as seen in sub -code snippet 6-1. This shortcode uses [ atts ] shortcode to create a section called “Basic Information” on the single view of manage (as seen in screenshot 3 ). [atts] shortcode accepts two arguments contact_post_id and meta_data. these arguments receive parameters from the single_data environment variable.
[atts label = "Basic Information" contact_post_id={single_data.contact_post_id} meta_data={single_data.contact_data} /]
[action]display_form[/action]
Sub-Code snippet 6-1: [atts] and [action] shortcodes in the lead-block module.
Lastly, edit form of Contact is created using [field] shortcodes with [edit_service] responsible for displaying the form and [update_service] shortcode responsible for updating the Contact data after edit form submit. Below sub-code, snippet 6-2 depicts this.
  //** Edt Update Section **//
    [edit_service action="common.crud-single-contact-data.get_edit_contact_data"]
    [update_service action="common.crud-single-contact-data.update_contact_data"/]
    [field contact_post_id label="Contact Id" edit=no data_type="text" /]
    [field title label="Title" edit=no data_type="text" /]
    [field name label="Name" edit=yes data_type="text" /]
    [field email label="Email" edit=yes data_type = "text" /]
    [field mobile_no label = "Mobile Number" edit=yes data_type="text" /]
    [field address_1 label="Address_1" edit=yes data_type="textarea" /]
    [field address_2 label="Address_2" edit=yes data_type="textarea" /]
    [field designation label="Designation" edit=yes data_type="text" /]
    [field contact_county label="County" edit=yes data_type="select" taxonomy="contact_county" /]
    [field contact_city label="City" edit=yes data_type="select" taxonomy="contact_city" /]
    [field contact_industry label="Industry" edit=yes data_type="select" taxonomy="contact_industry" /]
Sub-Code snippet 6-2: Single Contact Edit and Update options in the “lead-block” module of Common Services.
That’s it for the Single view of Manage screen. We are now able to View, Edit and Update a Single Contact.
Final Notes
This tutorial was an attempt to explain about “How to build Enterprise Manage” using a fictitious example “Contacts App.” Even though the tutorial is lengthy, it scratches just the surface of “Enterprise Manage.”
To explain each & every concept along with its working in one tutorial is impossible. Definitely, in the near future, more documentation, explanation of core concepts, more supporting tutorials of Enterprise Manage will be planned.